Overview
Open the Knocket console and click Web Widget in the left sidebar. The page is split into three tabs — Appearance, Home page, and Conversation page — with a live phone preview on the right that updates as you edit. Nothing goes live until you press Save at the bottom.
Interface language, brand color, launcher style, FAQs, welcome message, quick-connect channels (WhatsApp / Instagram / Telegram / Messenger), meeting booking link, offline hours, and the pre-chat form that greets visitors when you're offline.
Appearance
The Appearance tab controls the widget's look — the language of every UI string, the accent color, the launcher shape, and the FAQ items shown before a visitor starts a conversation. Everything here re-renders in the preview on the right as soon as you change it.
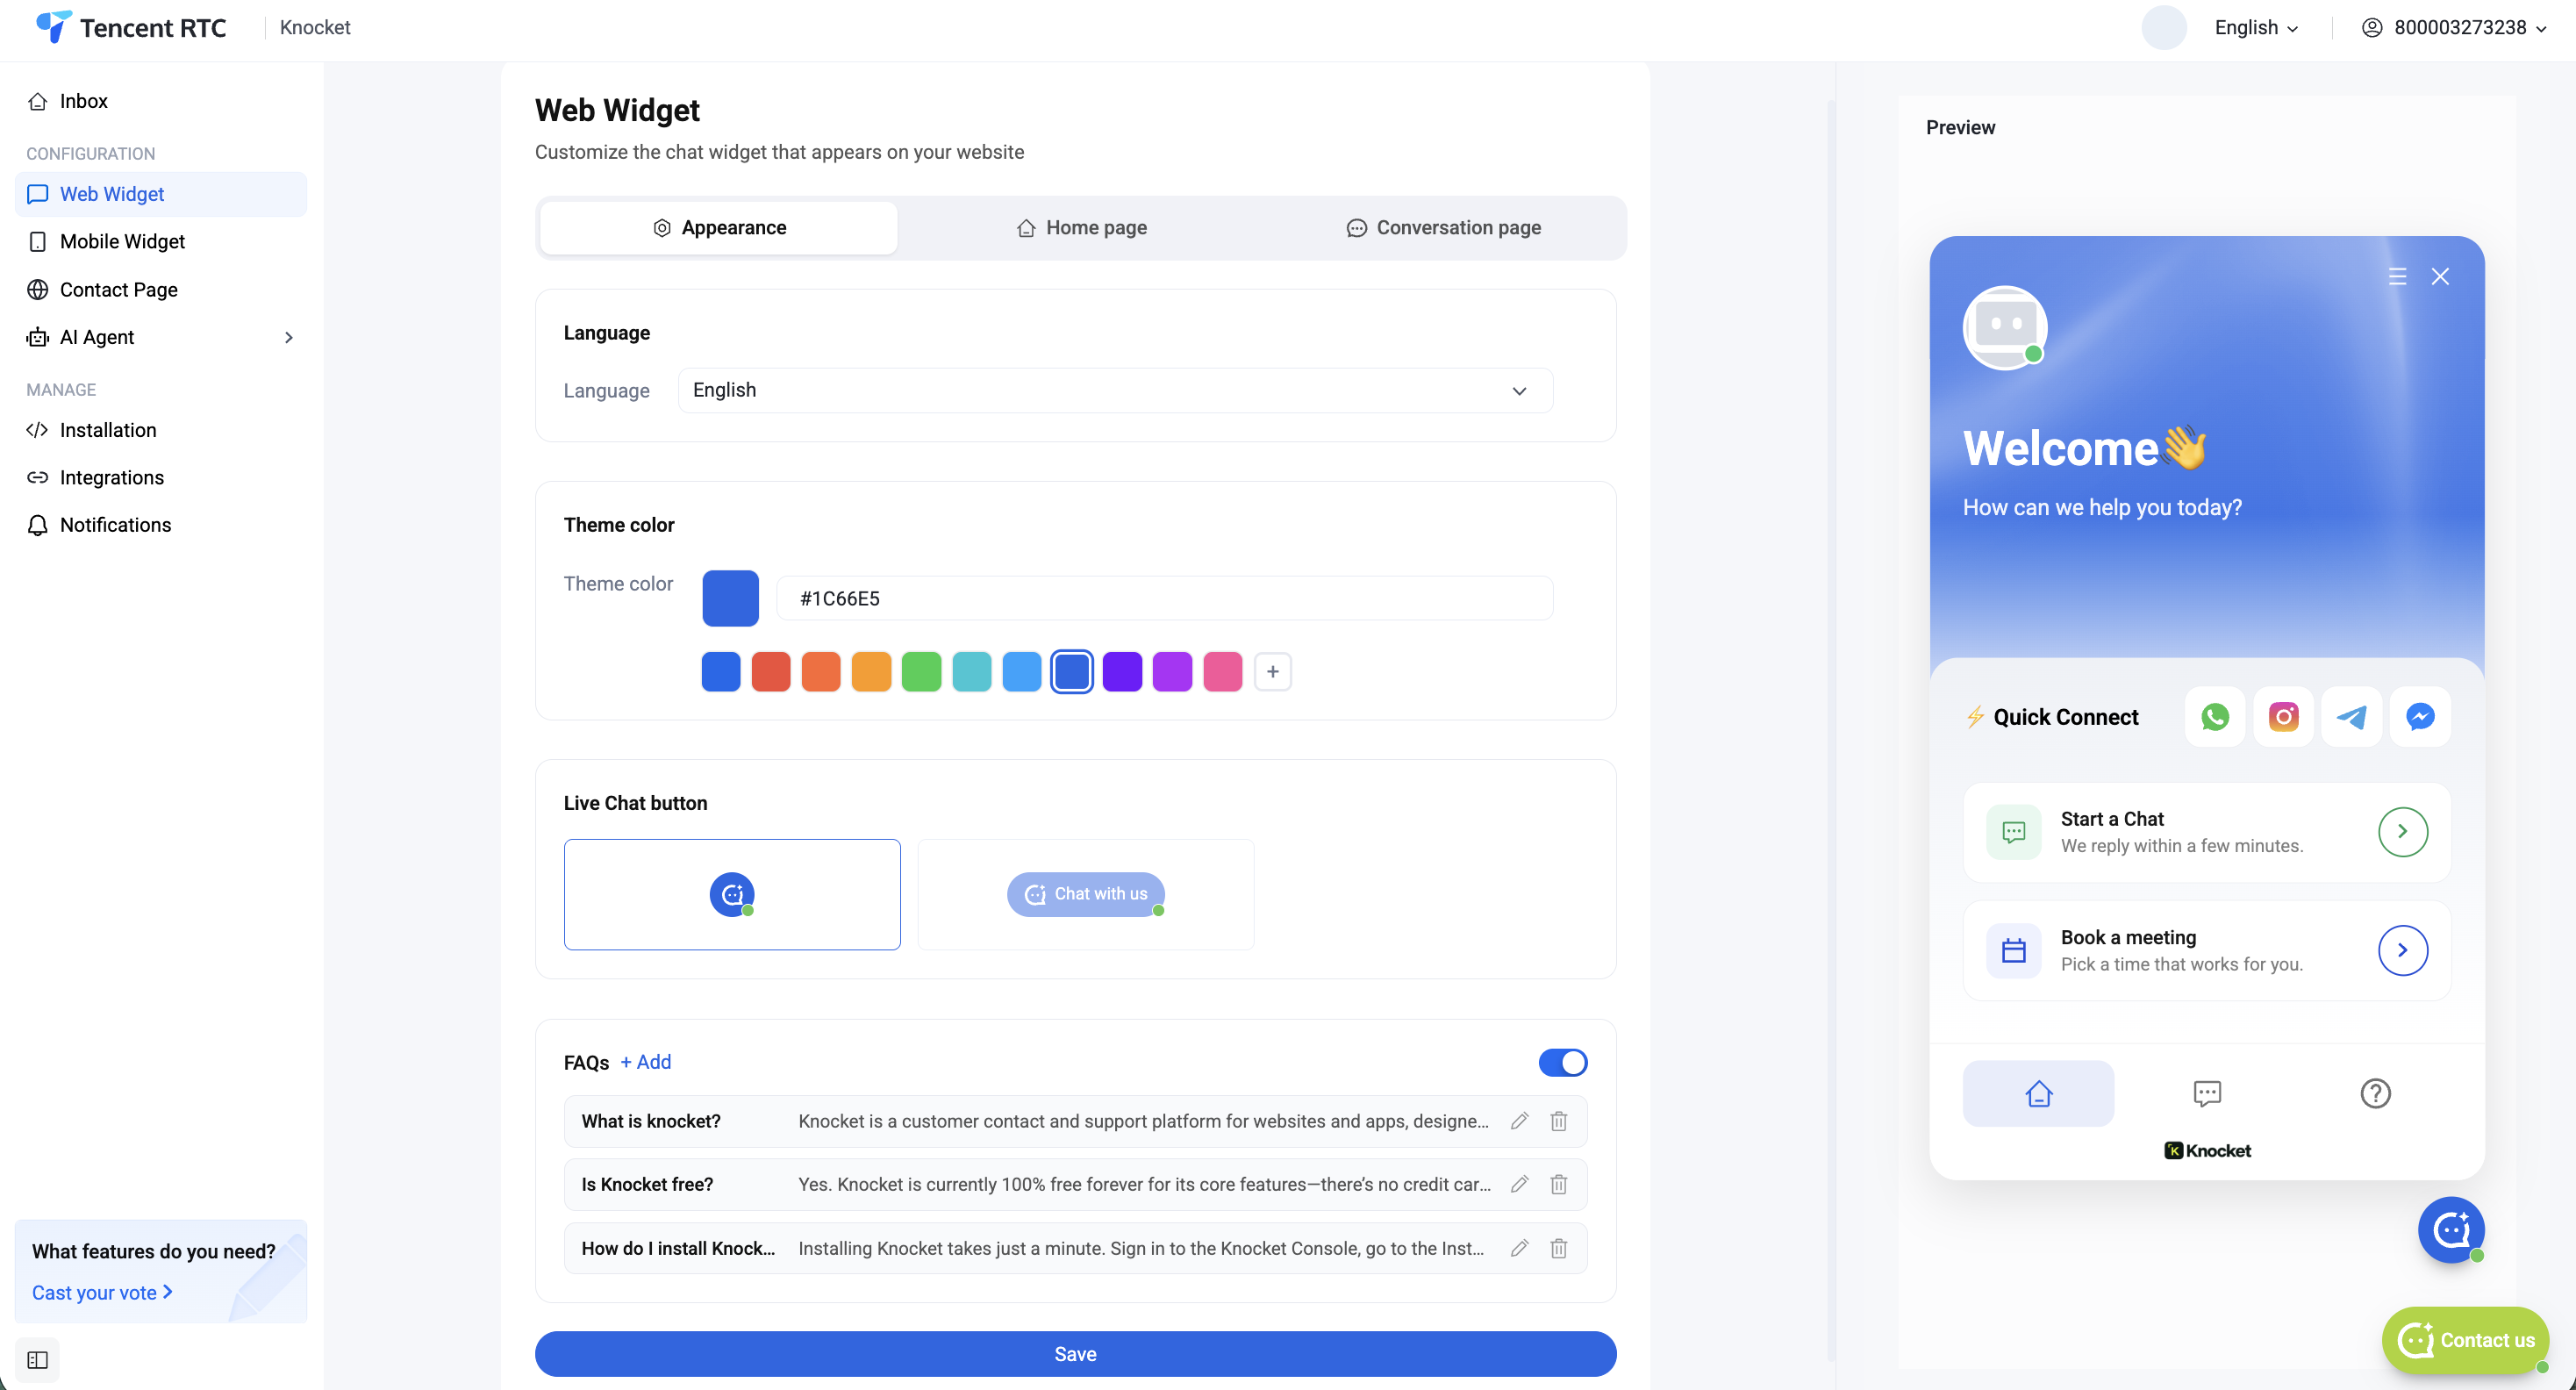
- Theme color. Pick one of the ten presets or paste a hex value (e.g.
#1C66E5). The color drives the header gradient, the "Start a Chat" button, and the launcher bubble. - Live Chat button. Choose between the round icon launcher or a pill-shaped "Chat with us" button, depending on how prominent you want the entry point.
- FAQs. Add up to a handful of common questions with short answers. Toggle the section off if you don't want them shown at all. Click the pencil to edit, the trash to remove.
Language
Open the Language dropdown at the top of the Appearance tab and pick from the built-in list — English, Türkçe, Nederlands, हिन्दी, العربية, Tiếng Việt, ภาษาไทย, українська and more. Every UI string in the widget — greetings, form fields, error messages, RTL layout — switches immediately.
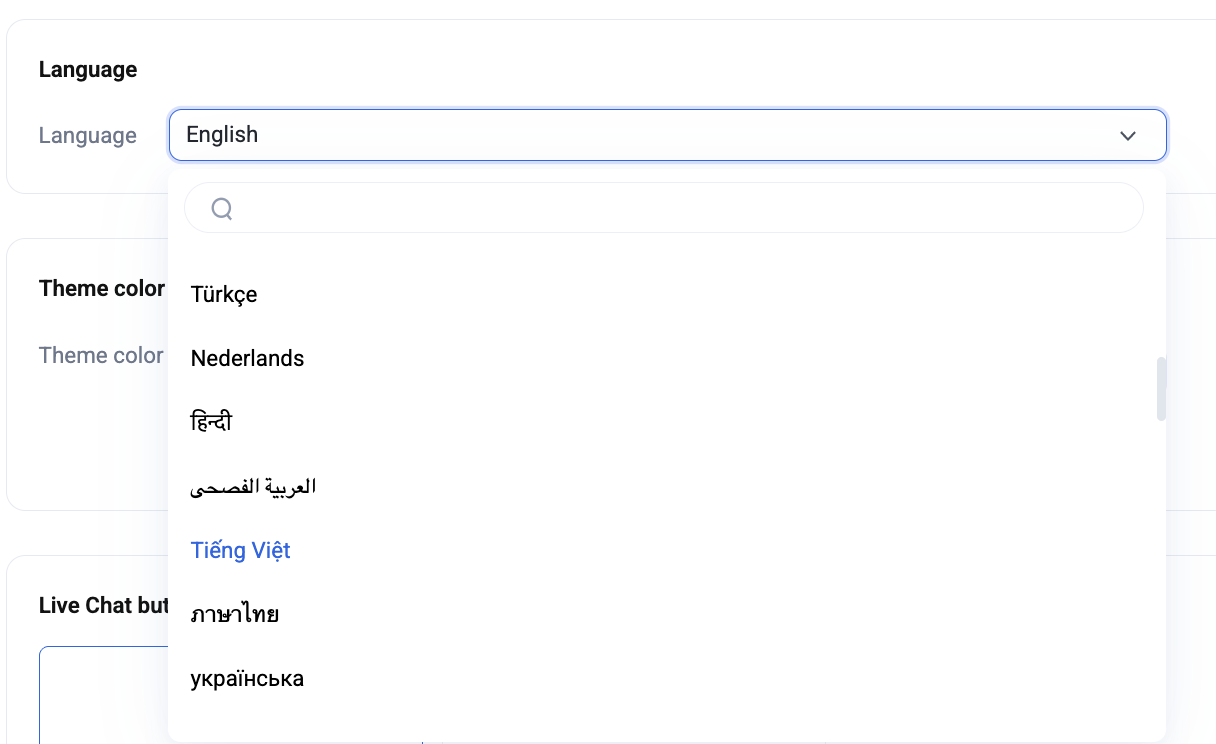
All locales, codes, and RTL status — ranked by global speaker count.
Home page
The Home page tab is what visitors see the moment the widget opens — before they've started a conversation. This is where you set the greeting, your brand logo, and the shortcuts (Live Chat, Meeting Scheduler, Social media) that let visitors reach you the way they prefer.
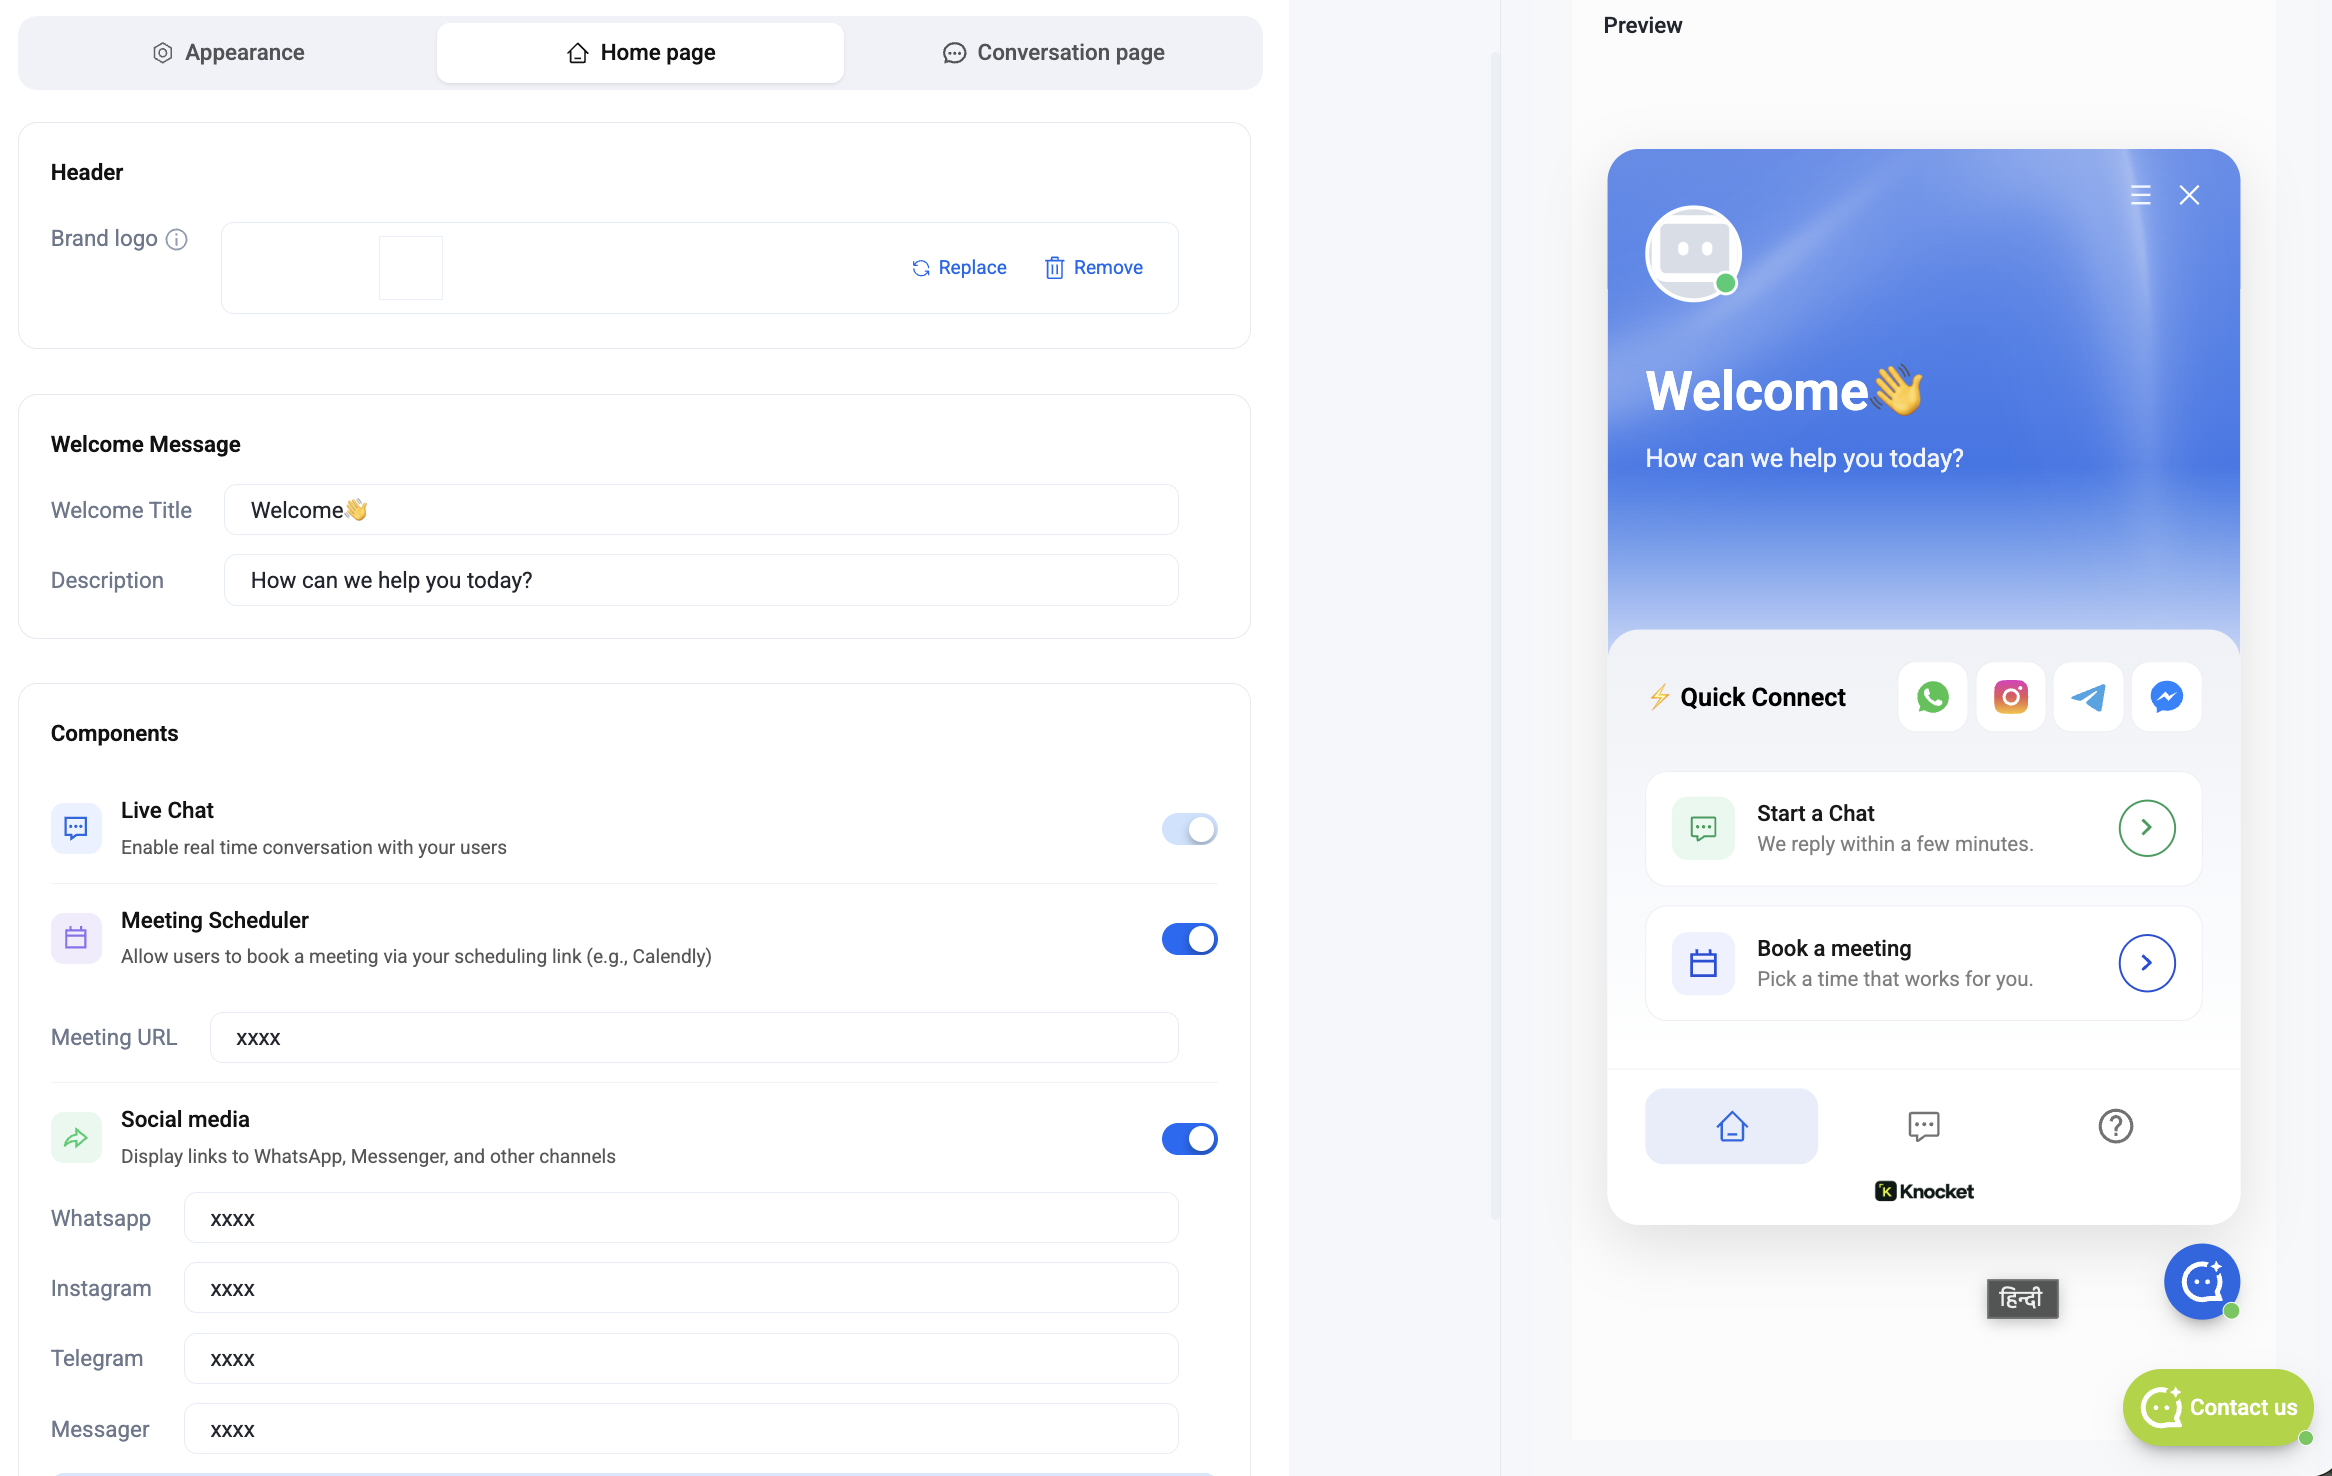
- Header — Brand logo. Upload a square PNG or SVG (Replace / Remove). It sits top-left of the widget header.
- Welcome Message. Set the Welcome Title (e.g. Welcome 👋) and a one-line Description (How can we help you today?). Both support emoji.
- Live Chat. Toggle on to enable real-time conversation. This is the "Start a Chat · We reply within a few minutes" card on the widget home.
- Meeting Scheduler. Toggle on and paste a Meeting URL — Calendly, Cal.com, Savvycal, or any scheduling link. Visitors tap "Book a meeting" to open it in a new tab.
- Social media. Toggle on and paste your handles/URLs for WhatsApp, Instagram, Telegram, and Messenger. Each channel becomes an icon in the Quick Connect row.
Every field is optional — leave a channel blank and its icon disappears from the widget.
Conversation page
The Conversation page tab controls what happens once a visitor taps Start a Chat. Set your assistant name, define availability, and decide what info to collect from visitors before the conversation opens.
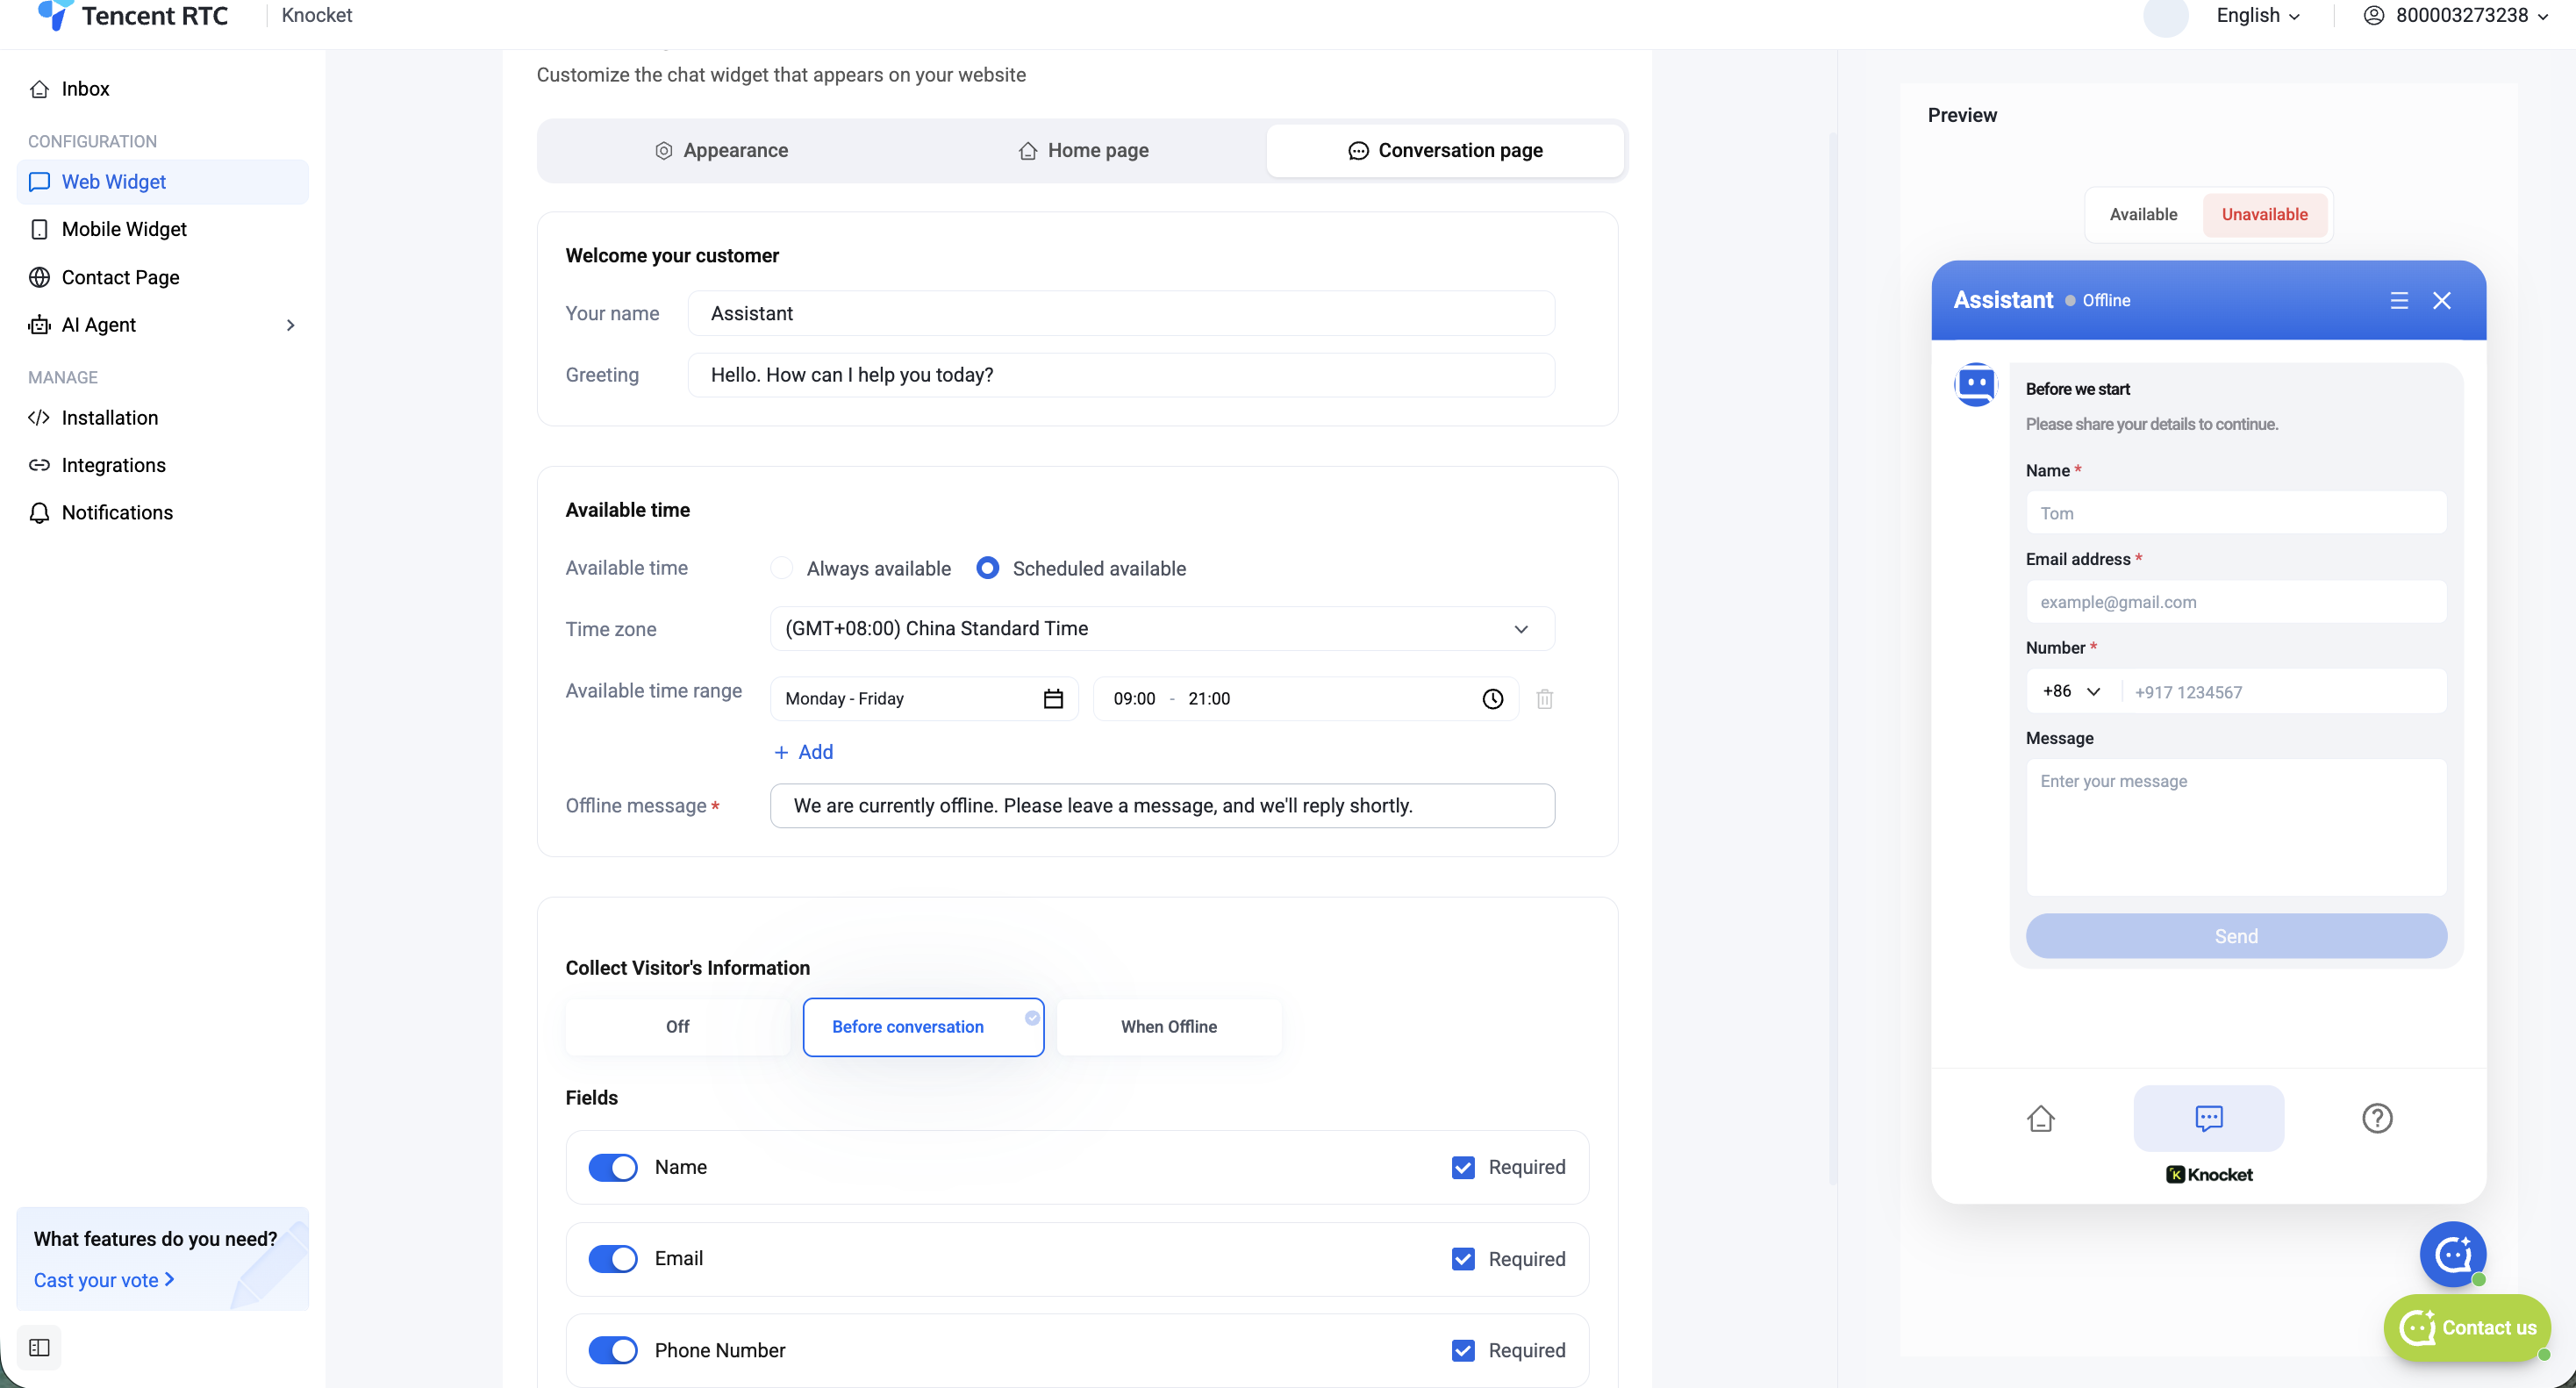
- Your name. The display name shown in the conversation header (e.g. Assistant). Add a real teammate name here to feel more personal.
- Greeting. First message the visitor sees inside the conversation panel — Hello. How can I help you today?
- Available time. Choose Always available or Scheduled available. If scheduled, pick a time zone and add one or more day/hour ranges (e.g. Monday–Friday · 09:00–21:00).
- Offline message. Shown when a visitor arrives outside your available window — We are currently offline. Please leave a message, and we'll reply shortly.
- Collect Visitor's Information. Choose Off, Before conversation (always ask), or When Offline (only when you're away). Then enable individual fields — Name, Email, Phone Number, Message — and mark each as required or optional.
Set Collect Visitor's Information → When Offline so online visitors chat instantly (no friction), while offline visitors leave contact details you can follow up on in the same thread.
Install on your site
Once your widget looks right in the preview, open Installation in the sidebar and copy the snippet. Paste it before </body> on any page you want the widget to appear — WordPress, Shopify, Webflow, Next.js, plain HTML, anything the browser can render. See the dedicated Web Widget product page for platform-specific placement.
- Finish configuring Appearance / Home page / Conversation page. Press Save.
- Click Installation in the left sidebar.
- Copy the one-line
<script>tag — it already carries your unique identifier. - Paste it just before your site's closing
</body>tag and deploy. - Reload — the launcher appears bottom-right. Messages flow into your Knocket inbox and Telegram in real time.
FAQ
Do changes require a redeploy?
No. Anything you change in the console — colors, welcome copy, FAQs, availability — pushes to the widget live within a few seconds. Only the initial script-tag install requires touching your site.
What if I leave WhatsApp / Instagram / Telegram / Messenger blank?
The icon simply doesn't render in the Quick Connect row. Enable a channel any time and paste the URL — it appears immediately.
How does the offline flow work?
Outside your Available time, visitors see your Offline message and the pre-chat form (if enabled with "When Offline"). They leave contact info + a message; you reply from the Knocket inbox or Telegram, and the thread continues in place.
Can visitors send images or files?
Yes — attachments (images, videos, files) are supported in every conversation and land in your inbox and Telegram side-by-side with the text.
Where does the AI Agent fit in?
If the AI Agent is enabled in your workspace, incoming widget messages are routed through the agent first. It answers routine questions and hands off to a human when it can't. See the AI Agent tutorial.
Open the console — Web Widget · Appearance · Home page · Conversation page. It takes about five minutes.